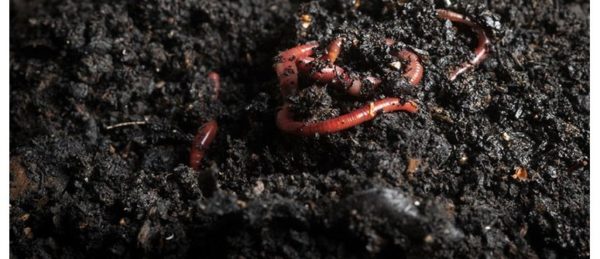
Starting a worm bin at home is a simple and easy process. Whether you’re looking to start it to recycle your extra food waste or trying to achieve the power of worm castings AKA black gold. This guide is simple, short and to the point. If you’re interested in the power/benefits of worm castings check out our previous post diving into them.
Getting started on your worm bin
Figuring out whether you want to use the power of worms as recyclers or for their magic poop can lead you to different bins. Will try to cover several different bins that we have seen most home gardeners and recyclers use.
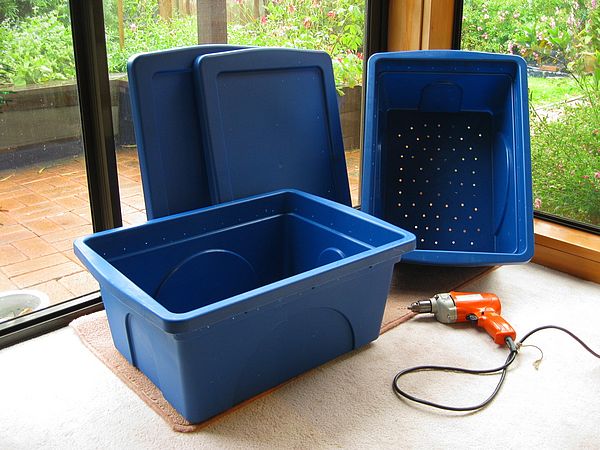
- The stacked bucket bins – The bucket bin is a simple low cost bin to build. Using two bins stacked together drill small holes 1/8th inch thick in the bottom of the bucked that will be on top. Make sure you have plenty of holes 20 to 30 should do. The bottom bucket doesn’t need anything done to it. It is only there to capture excess moisture. This concept of holes in the top bucket or bin goes with most worm bins you’ll find on the market. You can scale this method up as much as you want whether using buckets or large containers (you can also buy worm towers if you prefer instead of going the DIY route). Be sure to put several holes in the lid on the bucket, worms need oxygen to survive like us. Every couple of days check the bottom bucket to see how much excess moisture accumulates. Many people use this liquid on the bottom of the bin in their garden and call it worm pee. You can use it if you like but I find the true nutritional value lies in the castings.

- Single bin – using a single bin to do your worm casting can be done. It can also run into more issues. Like the stacked bin you’ll want to put holes in the top as well as the sides. The issue that most run into is overwatering of the bin. If too much moisture builds up at the bottom of your bin and the worms can’t handle it you’ll know there’s a problem real quick. When you open the lid if you get a strong sewer like smell your bin has gone anaerobic. This is bad news and your worms won’t be able to live in it. This way of worm farming can come with several issues but if you track the moisture and conditions of the worms it can work as well.
- Bathtub bin – Yep, it’s exactly how you think it’s going to be. Got an extra bathtub laying around? Well many people do and what turns out to look goofy actually works pretty well. Clean your bathtub first then put a 1/8th inch wire mesh covering the drain hole of the tub. Once you have this set begin filling the tub with your worm bedding. This method is more for people in a warmer climate year round. Being that you probably won’t want to bring your worm bathtub in for the winter months. Also be sure to add some kind of a top lid to this as well, could be a piece of plywood, tarp, or even burlap sacks.
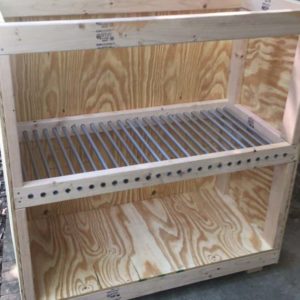
- CFT(continuous flow through) – A CFT bin is one of the easiest methods when it comes to harvesting castings and managing moisture levels. A CFT essential has a false bottom that is either able to be unzipped and opened or continuously open. There are several kinds you can order or create yourself. The image at the bottom is one someone is building. The final wall isn’t on it of course but you can see the bottom is made of galvanized conduit pipe that is spaced out. When it’s first being filled you need to put a newspaper or some kind of paper product to hold the material in. After it has been filled and the worms have worked on the material it will be condensed enough that most material should fall through. Then when you are ready to harvest castings you simply scrape the bottom. With the way most composting worms function they prefer to stay in the top 6 inches of material. This means you won’t find as many worms when you harvest as long as you have more than 6 inches of material in the CFT bin. If you’re not much into building your own CFT you can find tons that are premade or CFT bags.

There are many other types of worm bins out there but they generally follow the same rules as the ones mentioned above. Having holes to breath, and a place for excess moisture to go.
The moisture level
Moisture in your worm bin is vital. Too dry and the worms will die if it’s too wet they will try to leave and it can go anaerobic. The best way to tell if its the right moisture content is actually pretty simple. Grab a handful (try not to have worms in it) and squeeze it. Ideally if you can get one water droplet then the bedding is in a great moisture range. If you’re getting tons of water droplets or none at all you need to add or reduce moisture. Don’t try to fix issues immediately unless they are really bad. The slow and steady approach is much better to prevent an overcorrection.
Temperature
This is pretty straight forward any temperature you prefer the worms will prefer. Keeping the bin between 55 – 77 degrees Farhenheit is going to be ideal for constant production. Red wigglers are a very common worm to use and also a pretty tough worm. They can survive a range of temperatures, but once it gets below 40 degrees or above 100 you can start to expect some to die off. Be cautious of where you set your bin up and the weather conditions it could face.
Bedding
Using the right bedding is incredibly important for your worm’s survival. Here is a list of recommend bedding:
- Coco Coir
- Aged manure from animals (not cats or dogs)
- Compost
- Shredded cardboard
- Straw
- Peat Moss
- Aged fine wood chips
- Leaves (preferable that have been soaked in water to make them more moist
- Shredded paper that hasn’t been bleached
- Yard waste
If you read the previous post you’ll know not all bedding material is the same. Some will lead to much better worm castings while others are just filler. Peat moss is a commonly used bedding for most big time worm casting providers. The problem is peat doesn’t provide nutrients to the worm or make high quality castings. Remember worm castings are only as good as what you feed the worms. Using something like good compost, manure, or diverse nutrient dense food will get you the quality your plants want.
Feeding worms
Again feeding worms quality will get you quality. Worms are incredible degraders and love tons of diversity. The list of things not to feed worms is short and those are things like:
- Citrus
- Meat
- Dairy
- Cooking oils, fats, grease
- Bleached paper
- Onions
- Grass that has been treated with lots of pesticides
- Heavy salted foods
- Spicy foods
- Dog or cat waste (or any waste recently treated with dewormers)
- Plastics
- Too much sawdust
Many of these items can be consumed by worms so if you accidentally add them don’t completely freak out. The problem is these items can attract other pests that can cause major issues in your worm bin. The best things to feed worms are:
- Manure
- Crushed egg shells
- Leafy greens and vegetable waste
- Compost
- Leaves
- Coffee grounds
- Grains
- Fresh spent brewers grain
- Watermelon
- Squash
- Cantaloupe
- Pumpkin
- Avocados
- Bananas
- Breads
Dealing with good pests
Good pests or beneficial insects are going to be a common thing found in your worm bin once it gets going. Worm bins are never meant to be just a single species away from other natural insects. A couple beneficial insects you’ll most likely find in you bin are:
- Springtails
- Rove Beetles
- Pseudoscorpions
- Earwigs
- Millipedes
- Black Soldier flies
- Roly polys
Eventually you’ll see many of these insects in your bin, and know they are helping with the decomposition process. Knowing these beneficials from other insects is vital to maintaining a healthy stable worm bin.
Starting a worm bin can be an incredibly fun way to recycle your waste and get one of the best fertilizers on the planet. You can start big or small and even grow it into a small business. I hope this information helps you get started on your worm journey. If you have any questions about this article please leave them in the comment section and will get to them as soon as we can. Thanks for reading!

